Scopes
Scopes are another trick of the ISO Topic Maps standard. They are used to divide your topic map into multiple domains, and to filter the displayed data according to one of these domains.I. Creating Scopes
As we saw earlier, creating scopes is just a matter of adding associations to the Scopes topic. The rule is : for a topic Foo to be used as a scope, it must have an association with the Scopes topic; this association must be of type 'Class/Instance', and the role of Foo in this association must be 'Instance'. To put it shortly, scopes are instances of the 'Scopes' topic. As soon as a new scope is created, it is available to every user, everywhere in the program.But there's a second way – maybe easier – to create new scopes : if you open the scope selection window (for example by clicking the 'Edit Scope' button on top of the main window), you'll see a 'New Scope' button. Using this button, no need to play with associations to the Scopes topic. The new scope is directly created and available. Way faster ... :-) But of course, only the users allowed to modify the Scopes topic will be allowed to create new scopes this way; for the other users, the 'New Scope' button will not appear in the window.
II. Assigning a Scope
A scope can be assigned to :- topics, using the 'Edit scope' button on the main window,
- associations, using the 'Edit scope' button on to association edition window
- documents, by right-clicking an occurrence in the Documents tab, and choose the 'Edit scope' menu entry.
- shortcuts, by right-clicking an one of the shortcuts, and choose the 'Edit scope' menu entry.
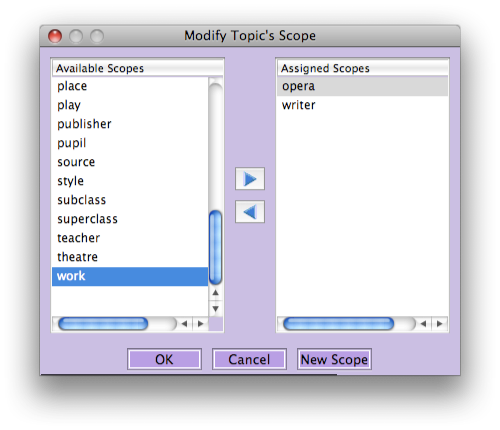
Whether you want to assign a scope to a topic, an association or a document, it will always be done using the same little scope edition window. This window shows two lists, the left one containing the available scopes, the right one the scopes already assigned to the selected item.

- selecting a scope and moving it by clicking on the arrows between the two lists
- double-clicking on a scope
- typing the Enter key once you have highlighted the scope you want
- dragging and dropping a scope from one list to the other.
III. Using Scopes
Once you've set up your scopes, and assigned them to your topics, associations and documents, it's time to play with them.From the main window's toolbar, you can use the 'Scope' selection box to choose the scope you want to browse for browsing. By default, 'Any scope' is selected, which means that no filter applies to what is displayed – this is usually called the 'unconstrained scope'. But as soon as you select some specific scope, the buttons areas and the documents tab will update to limit the data they display to what belongs to the selected scope. And from then on, all associations, topics and documents you create will automatically be assigned that scope. But beware that topics and documents that aren't assigned any scope will not be affected by this filter, and will always be displayed.
Another place where to use scopes is on the search window. Instead of searching the whole database for some special topic, you can limit your search to one specific scope, allowing faster and more precise searches.
Scopes are also used when importing or exporting XTM files. When you import, you can decide to assign one or more scopes to the imported data. And when you export, you can choose to process only data belonging to some specific scope.
One last use of scopes is in the shortcuts window, as we saw earlier : each shortcut you create can be assigned a scope (by right-clicking on the shortcut, and choosing the 'Modify scope' menu entry). So that when you click on that shortcut, not only will it open to the selected topic, but the current scope will also switch to the one assigned to the shortcut. This way, associations created after having clicked a shortcut are almost sure to get the right scope automatically.