Associations
Associations may be the most important Goozzee feature, so let's take some time to review them in detail. As seen earlier, associations are links that you create between multiple topics, allowing an easy browsing from one topic to another. These associations appear as buttons on both sides of the main window.I. Creating associations
Adding new associations to a topic can be done in many different ways :
- Using the 'New' button
Both buttons areas have a 'New' button at their bottom. This button allows the creation of an association linking to a new topic. Clicking this button will open the Topic Creation Window. In this window, all you have to do is enter the title of the topic you want to create. The other fields are all pre-filled with default values. But of course, you can modify any value and fine-tune the security settings, the scope, the class the new topic will belong to, or even the role of the new topic in the association that will be created.

If you intend to create a topic that doesn't belong to any class, just click the 'No specific category' toggle button.
After clicking OK on this window, the program will check if the title you entered corresponds to a topic that already exists. If it find any topic with the same title, it will propose you to reuse this topic, instead of creating a homonym. - Drag'n dropping
This is the easiest way to create an association between two existing topics. Dropping a topic from a search result into one of the buttons areas, an association will be created, where the topic you just dropped will get the role corresponding to the area where you drop it. If you happened to drop the topic over a link button, the association you create will get the same association type as the link over which you dropped. (more about the search feature right here)
For example, referring to the previous screenshot of the Otello topic, if you drop some 'foo' topic onto the 'Ricordi' button, an association will be created between Otello and Foo, and Foo will appear as a publisher of the Otello opera. And the new association will be of type 'Published by' – Hard to explain… Try it by yourself, and I'm sure it'll become obvious. - Using contextual menus
Right-clicking anywhere on one of the buttons areas will pop up a menu where you can create a new association with a new topic (using the Topic Creation window we saw earlier). Same as for the drag & drop method, depending on where you right click, the new association will get the same role and association type as the link on which you right-clicked. As you may have already noticed, the contextual menu offers also other possibilities :- deleting the selected association
- modifying the selected association
- adding the right-clicked topic to the shortcuts list.
Beware that you don't need the Modification right on topics to create links between topics. As soon as a user is allowed to view topics, he's also allowed to create associations between them. The Modification right is only the right to modify the notes, documents and properties of a topic. It does not restrict the creation of associations.

No will force the creation of a new topic, and associate it to the current topic. Cancel will bring you back to the dialog that asks you for a topic name. This way, you're warned, but still free to do as you like... even though homonyms can become confusing in a repository.
Finally, note that all the associations you create, whatever the way you do it, will be assigned the current browsing scope, i.e. the scope selected in the toolbar.
II. Modifying associations
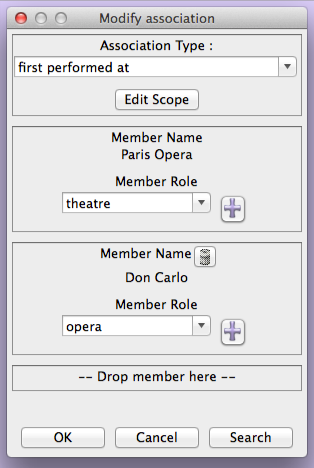
Another window you'll sometimes have to play with is the Association Edition window. It will appear when you right-click on some association button and choose the 'Modify association' menu entry.

This window is split in three vertical parts :
- The top part shows the properties of the association itself : its type, and a button to view/modify its scope.
- The lower part for the buttons.
- The middle part of the window shows all the members of the association. By 'All the members', I mean that an association may link more than two topics together. In fact, one single association could have an unlimited number of members.
If, while editing an association, you realize that you need to create a new role, you can do it right from this window, by clicking the little '+' button beside the Role drop-down box. Of course, this button will only appear if you're allowed to create roles (or if you have administrator rights :-) ).
Access rights also apply to the Association Edition window : you will only see the association members you are allowed to see. If you're not allowed to read some members of the association, they will not appear among the members, but a little message at the bottom of the window will inform you that some members are hidden.
Note : you can open multiple instances of that window, and modify multiple associations simultaneously. No problem. You can even go back to the main window and switch to another topic while editing an association : this association edition window is completely independent from the main window.