Security
a) Overview
Goozzee is designed to be 'multi-user', with a security system that restricts the access to topics and documents. The security model is quite similar to the one that can be found on Unix systems :- the program manages a list of users and groups. Each group can contain an unlimited number of users; each user is assigned a main group, and can belong to an unlimited number of secondary groups. But beware that these users and groups are internal to Goozzee, and have nothing to do with the users and groups of your operating system
- each topic keeps a record of who created it, and who updated it (the user, and this user's main group)
- each document records who uploaded it (the user, and this user's main group)
- each topic and document have security properties, that define access rights at the user level, at the group level, and for the rest of the users. For example, let's say the Foo topic is owned by user John, from the Accounting group. John will be able to set Foo's security properties so that, for example, he will be allowed to modify this topic, the other members of the Accounting group will be allowed to view this topic, and the rest of the users won't be allowed to view or modify it (it will be completely hidden to them.)
b) Managing Users
Managing users is done using this window.
Two fields deserve some explanation :
- Administrator : The Administrator box is checked if the user you selected is the administrator of the repository (the only one who can create users and groups)
- Main Group : Each user can belong to multiple security groups, but the main group of the user is the one that will be assigned by default to the topics and documents created by this user.
c) Managing groups
Managing groups is quite similar to managing users (see the window below).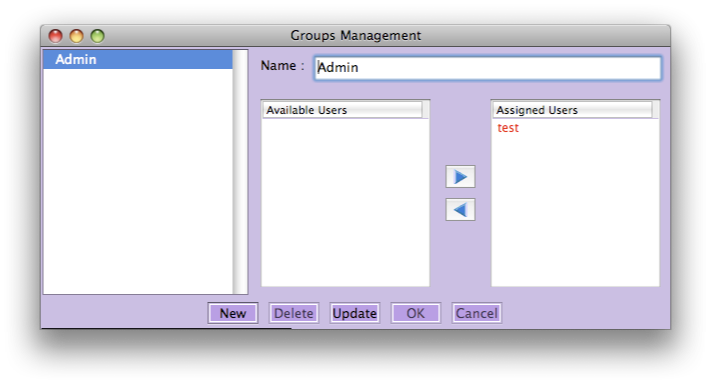
Adding/removing users to/from a group is just a matter or moving users from one list to the other, which can be done in three different ways :
- selecting a user and clicking on one of the arrow buttons to put it to the other list
- double-clicking a user
- dragging a user and dropping it into the other list.
When deleting a group, you'll have to specify a replacement group, so that all the topics and documents belonging to the deleted group will be re-assigned to the replacement group.
Beware that you cannot delete a group as long as it is used as the main group of some user -- such users will appear in red in the list of assigned users. What's more, you cannot remove a user from a group if this group is defined as his main group. So, let's make it short, when you edit a group, if you see red users in the list of assigned users, you cannot remove these users from the group, and you cannot delete this group.
Note that you can have both users and groups management windows open simultaneously. They will update each other, each time you create / modify / delete users or groups. But could can open only one instance of each.
d) Managing topics and documents access rights
Once we have created our security groups, and populated them with users, we can start restricting access on topics and documents. To view or modify the security settings of a topic, click on the locker icon, on the toolbar of the main window.- who owns this topic : which user and which group
- the access right of the owner : allowed to modify, allowed to view, or not allowed at all
- the access rights of users belonging to the owner's group
- the access rights of other users.
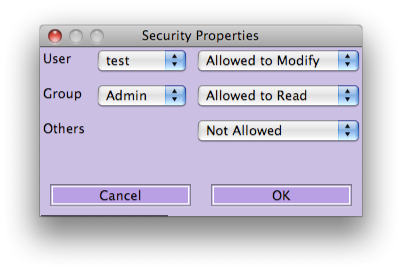
The same kind of access rights can be assigned to documents. Opening the Security Settings dialog is done by right-clicking a document, and choosing the 'Security Settings' menu item.
Beware that security restrictions do not apply to templates. So every note template is usable by everybody; you cannot restrict the use of a template to a specific user or group.
e) Locks
Goozzee implements a locking system to prevent multiple users from modifying the same piece of data simultaneously. This locking system applies to notes, properties and documents.Notes & Properties locks
At the bottom of the main window, a couple of buttons allow the locking of notes and properties simultaneously (Edit, OK and Cancel).By default, when you open a topic, it appears as read-only : the notes editor remains scrollable, but isn't editable; the properties are visible, but can't be updated. To be able to modify these data, you must first click the Edit button, which will allow you to modify the Notes and the fields from the Properties tab. The OK button will be used to save the modifications and go back to the read-only mode, while the Cancel button will revert all the modifications you had made.
When a user is modifying a topic, this topic appears as Locked for the other users: for them, the Edit, OK and Cancel buttons disappear, and are replaced with a message that explains who is currently locking this topic. The lock will be removed as soon as the user who is busy modifying the topic clicks OK or Cancel.
In case of a Goozzee crash while the user is modifying a topic, this topic will remain locked by this user, so nobody will be allowed to modify it anymore. To unlock this topic, two solutions :
- the same user restarts Goozzee and re-opens the same topic : this will automatically reset the lock.
- an administrator user opens this topic and uses the Unlock button to remove the lock. (in fact, the Unlock button will always be greyed-out, unless your user has administrator rights)
Documents locks
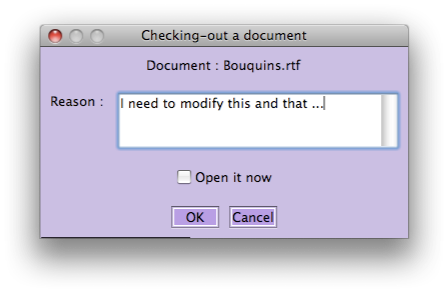
Documents have their own locking system. Locking is done by checking files in and out. When a user wants to modify a document of the repository, he must first right-click this document and check it out. A lock will be put on the document, and it will be downloaded on this user's computer in a directory named :