Main Screen
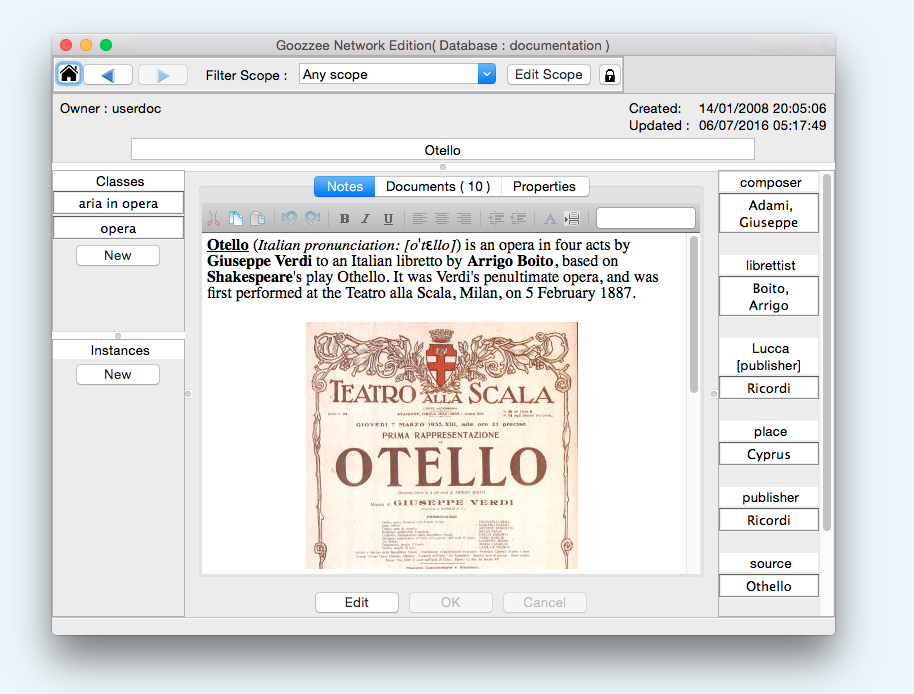
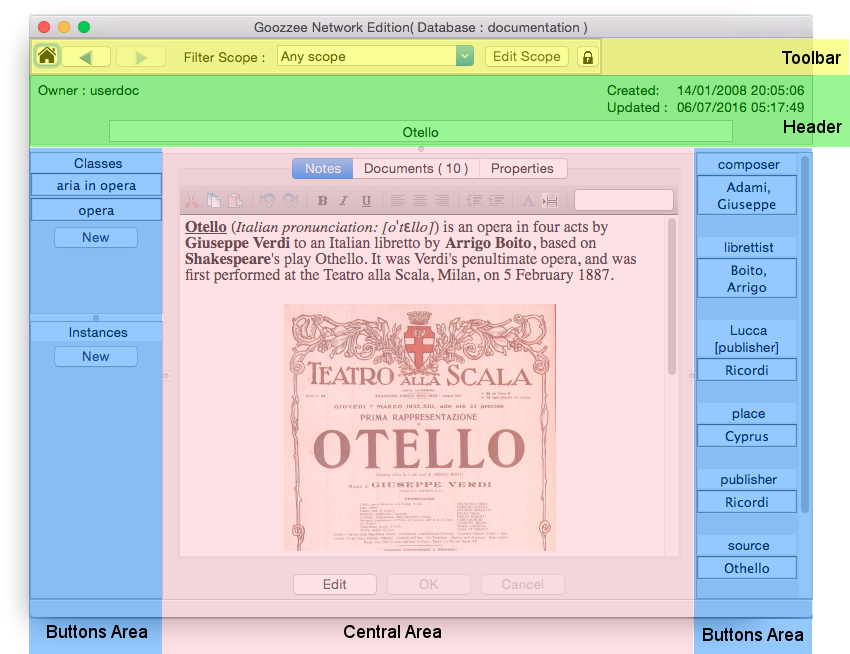
The main window always shows one topic at a time – from now on, we'll call this displayed topic the current topic –, with all its documents, properties and associations. Here is, for example, the main screen showing a topic about the Otello opera.

I. The Toolbar
Even though the toolbar seems pretty empty, the few elements it contains will be very useful when navigating you topic maps.
First, the Home button, that opens the Root topic.
Then, the two horizontal arrows on the left are here to play with your history. Just like a web browser, it allows you to go back and forth to former visited topics. Right-clicking on one of these arrows will display a history list (backward or forward) of the topics you visited, so that you can jump far forward or backward with just a couple of mouse clicks.
This history is updated each time you open a topic, and is stored inside Goozzee's database, so that it is persistent : if you quit Goozzee and go back to it two days later, your history will still be here. And if you run Goozzee with the same user, but from another computer, your history will follow you there.
But beware that this history can become VERY big and messy pretty fast. So, every now and then, I advise you to clean it up. To do so, right-click on one of the history arrows in the toolbar, and choose the 'Reset History' menu item.
The second interesting area of the toolbar is the Scope selection box. When you select a scope from this list, it will filter the data displayed on the main window, and restrict it only to what belongs to that selected scope. Note that topics, occurrences and associations that aren't assigned any scope will always be displayed, whatever the scope you select for browsing. By default, only one scope is created during the initial setup of the database : the 'Metadata' scope, which contains all Goozzee's metadata topics. But more later about Scopes.
Next is a button labelled 'Edit scope' that you will use to assign a specific scope to the current topic.
II. The Header
The top area is what we'll call the Header; it shows the current topic's title, by whom and when it was created, and when it was last modified. This area is pretty static, mainly displaying read-only data. The only thing you can do there is :
- double-click on the topic's title to modify it
- right-click on this title to open a contextual menu that allows you to rename the topic, or add it to your shortcuts (more about Shortcuts later).
III. The Buttons Areas
On each side of the main window are 'Buttons areas'.
The one on the left side of the screen shows buttons separated in two groups : Classes and Instances. The buttons in the Classes groups are links to the topics that are parent-classes of the current topic; they give an indication on 'what is' the current topic (we can see from the screenshot that the Otello topic belongs to the Opera class, so Othello is an Opera). The buttons in the Instances group are links to the topics for which the current topic is a parent class. But classes and instances aren't necessary for basic editing and navigating, so let's forget them for now... (see Classes and Inheritance for more infos)
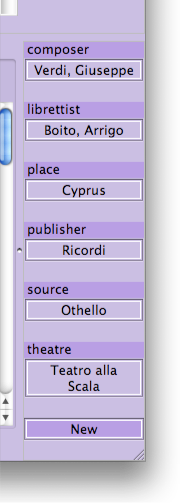
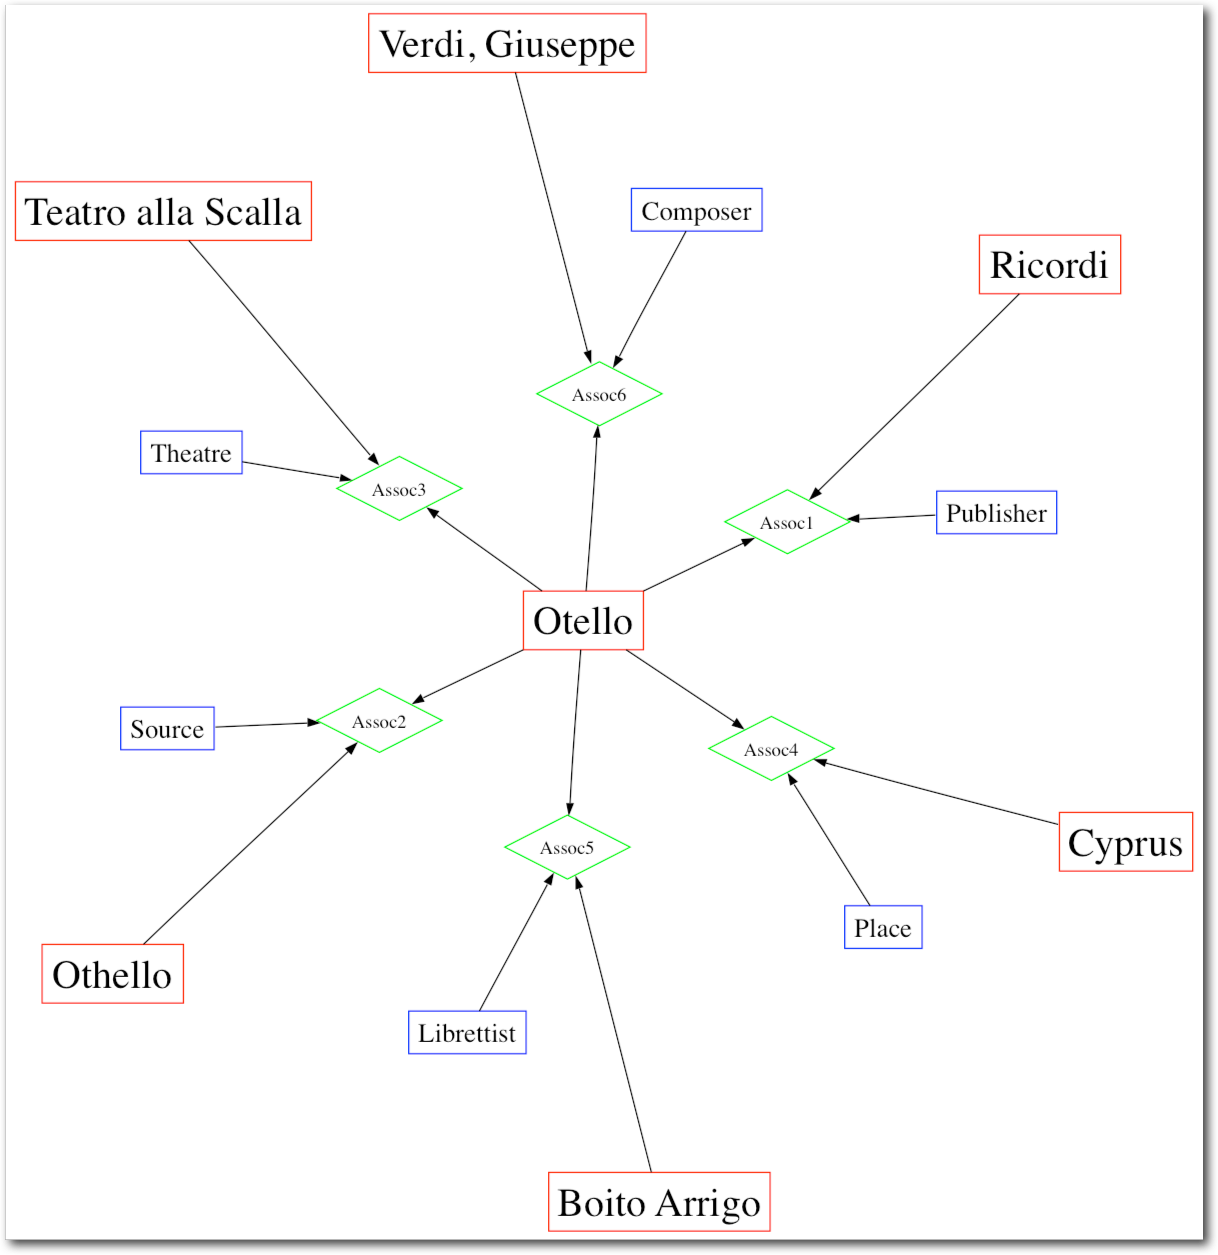
The right side of the main window shows another button area. This one displays links to all the topics associated with the current topic. All these topics are grouped according to the role they play in each association.

- it was composed by Giuseppe Verdi
- the librettist of the Otello opera was Arrigo Boito
- this opera was first published by Ricordi
- the story takes place in Cyprus
- it was first played at the Teatro alla Scala

Most of the time, displaying the role of the associated topics is far enough to deduct the meaning of the association. In our previous screenshot, the 'Boito, Arrigo' button being placed in the 'Librettist' category clearly identifies Boito Arrigo as Otelllo's librettist. But in some other cases, the meaning of the association is not so clear. For example, 'Cyprus' is associated to 'Otello' with the 'Place' role; but we don't know if it means that Otello was written in Cyprus, if it takes place in Cyprus, if it was first played in Cyprus... In such cases, you just have to leave your mouse over the not-so-obvious association button, and after a few seconds, a bubble help will appear, displaying the association type of this button. Having now the role and the association type, any association should have an obvious meaning.
What's more, since a category can contain a large number of buttons, when this number is greater than five, the number of buttons is displayed in the category label.
The size of the buttons areas can also be adapted by dragging the little handles on the border of the areas. The size of these areas will be saved in the database when you quit Goozzee, and restored when you relaunch it.
IV. The Central Area
The center of the main window is where you really store data related to the current topic: notes, documents and properties,each kind of data in its own tab.
a) The Notes tab: a place to store text.
Even though the Notes editor isn't a real word processor, it is a decent text editor with most of the features one would expect from such a tool :
- font management (font type, size and color, italic, bold, underlined, strike out…)
- paragraph alignment (left, right, centered)
- text indentation
- paragraph spacing as well as line spacing
- multiple undo/redo
- numbered and bulleted lists
- insertion of clickable URLs
- insertion of bitmaps, symbols, tables
- printing (with print preview and page setup dialogs)
- page breaks
To search for a string inside a note, enter the string in the search entry zone, at the right of the editor's toolbar, and press enter. F4 will search for the next value, while Shift+F4 will search backward. Please note that, if the string you're searching is spread over multiple cells of a table, it won't be found. But this should e the only case where search won't work.
Note that, when you open a topic, you cannot modify its notes until you click on the Edit button, at the bottom of the screen (this Edit button unlocks the notes and properties tabs simultaneously). If another user was already editing this topic at the same moment, this Edit button won't be available. Once your modifications are finished, click on the OK button to save them, or just go to another topic.
b) The Documents tab
The Documents tab shows the occurrences associated with the current topic. This place can be used to store any kind of files: texts, images, spreadsheets, sound clips, videos, absolutely anything... as long as the file you upload is smaller than the maximum you database allows (see Server Installation about his limitation).
The files you store in Goozzee are uploaded and kept inside the database. So once you have uploaded a file into the Documents tab, you can safely remove it from your hard drive.
The possible actions on this tab are :
- opening a document by double-clicking it, or via the contextual menu (right-click on the document) 'Open this document'. Most of the time, the right application will be automatically launched to view the selected document. If no application can be found to open that kind of file, you'll have the possibility to choose the application to launch for this type of file. If you don't choose any application, the file will be saved into a temporary directory, leaving you the freedom to open it with the application of your choice.
- renaming a document, via the contextual menu 'Rename', or by pressing the F2 key.
- modifying the scope of a document, via the contextual menu 'Edit scope'.
- removing the document from this topic, via the contextual menu 'Unlink'. Beware that the same document may be associated to multiple topics. But once a document is unlinked from all topics, it will be automatically moved into the Trashcan topic (see the Useful Topics section concerning this special Trashcan topic).
- uploading new documents and associating them to this topic, using the 'Upload' button, below the list. Remember, beware of the size of the files you upload : your database has a Maximum File Size setting ! (see Server Installation about this limitation). If the size of the file you're trying to upload is bigger than what you database can receive, a message box will appear to warn you, and, of course, your file won't be uploaded. Note that the upload of documents runs in a separate thread, which means that you can select many files for upload, and Goozzee will upload them in the background, while you keep on browsing, editing, or searching your repository. The main window's status bar will keep you informed of the number of documents still waiting in the upload queue. And if any error occurs while processing one of the files, a little dialog will appear once all the files have been processed. This dialog will show a report of all the errors : non existing files, files already in the repository, and files too big to be uploaded.
- saving a copy of a document onto your hard drive, using the 'Save into..' contextual menu.
- checking-in/out a document : The check-in / check-out system is a way to prevent multiple users to modify the same document simultaneously. If you want to update the content of a document, checking-it out will download it onto your computer, and other users will not be allowed to check this same document out – or upload a new version of it – until you choose to check it in.
Once you've finished your modifications in this document, check it in : it will be updated into the Goozzee repository, and it will be unlocked, so that other users will be allowed to check it out and add their own modifications. Note that checked-out documents can be found on your computer in a directory named:
/<your_home_directory>/goozzee.docs/<database_name><database_server_name>/ - Release a checked-out document, using the 'Release lock' contextual menu : if you checked a document out to update it, but you finally change your mind and decide that you don't need to modify it, you can just release its lock, so that it's available to other users' modifications.
- Modifying the access rights of the document, using the 'Security settings' contextual menu
- Make the document Inheritable/non heritable – we will talk later about classes and inheritance.
- View the details concerning a document by right-clicking on it and choosing the 'Properties' option.

Documents check-in/out
Documents have their own locking system. Locking is done by checking files in and out. When you want to modify a document of the repository, you must first right-click this document and check it out. A lock will be put on the document, and it will be downloaded on your computer in a directory named :This tells Goozzee that you open this document in order to modify it.
The check out dialog offers the possibility to enter a text (maximum 200 characters) describing the reason for the check-out, a check box at the bottom of the dialog proposes to open the document right away (otherwise, the file will only be copied on the local computer).
When you have finished your modifications on the document, you must check it in, in order to upload the new version into Goozzee.
The Check-in dialog also offers a text area to enter a description of the modifications that were appended to the file (maximum 200 characters). A checkbox appears at the bottom of the window, that proposes to remove the file from the local computer after the check-in.
Note that, for now, Goozzee doesn't keep any history of the various check-ins / check-outs that happened on a document. Neither does it keep any previous versions of the documents.
Note also that you can release the lock on a checked-out document, without checking it in : right-click on that document, and choose the "release lock" menu item. This will reset its 'checked out' status.
To sum up, here is a table reviewing all the actions available from the documents list :
| Action | How | Multi-file | Required access rights |
|---|---|---|---|
| Double-click the document, or 'Open this document' from the contextual menu | Read access on the document(s) | ||
| F2 on the document, or 'Rename' in the contextual menu | Write access on the document | ||
| 'Edit scope' from the contextual menu | Read access on the document(s) to view the scope, write access to modify it (them) | ||
| 'Unlink' from the contextual menu | You must be the owner and have write access on the document(s) | ||
| Click the 'upload' button at the bottom of the documents list. | Read access on the topic | ||
| 'Save into..' from the contextual menu | Read access on the document(s) | ||
| 'Check-in' from the contextual menu | Write access on the document(s) | ||
| 'Check-out' from the contextual menu | Write access on the document(s) | ||
| 'Release lock' from the contextual menu | Write access on the document(s) | ||
| 'Security setings' from the contextual menu | You must be the owner and have write access on the document. | ||
| 'Properties' from the contextual menu | Read access on the document |
c) The Properties tab
Finally, the 'Properties' tab. This is the perfect place to store atomic values, or very short data, such as dates, phone numbers, emails or street addresses, sizes, weights, etc…
Each property is composed of a property name, and a property value. Names and values are simple strings – no computation or anything else will be performed if you ever enter a number there : it's all treated as pure text. No formatting either (no underlining or italic or what...)
When you have many properties in the same topic, it may become interesting to organize your properties into categories. By default, all the properties are put in the 'Default' category (which you can, of course, rename to your liking). But if you right click on a category name, a contextual menu appears that allows you to create your own categories. The only restrictions are : all categories must have a unique name inside a topic, and each property must have a unique name inside its category. What's more, beware that a category won't be saved as long as it doesn't contain any property/value; so you can't create empty categories for future use, you must fill them with at least some property.
It's also possible to inherit categories from a class to its instances, and to predefine default values for some categories. This will be explained in the section about classes.
What's more, Goozzee uses hidden properties to store data for its own inner working. These properties are only visible when you are in 'Designer Mode'. They appear in white text on black background. You can modify or even delete these properties, but please don't touch them unless you really know what you do : removing the wrong one, or giving a wrong value to one of them could prevent Goozzee from starting.
By default, when you open a topic, the properties appear as read-only, until you click the Edit button at the bottom of the screen (this Edit Button unlocks the Notes and the Properties simultaneously). Once you've done your modifications, click the OK button to save them, or Cancel and go back to the previous version. When you save your modifications, the program checks that all categories and properties names are unique. If some problem is detected, you won't be able to go to another topic or quit Goozzee as long as you don't fix it.
All the actions possible on this tab are executed from the contextual menu :
- adding/deleting a category (only empty categories can be deleted)
- adding/deleting a property
- switching a property to/from 'inheritable'
- Shift + Enter creates a new property inside the currently selected category
- Ctrl + Shift + Enter creates a new category.