Goozzee's First Run
Once installation is done, you may wish to run Goozzee :-)On Windows computers, launch the GoozzeeNE.exe located in the bin directory On Linux machines, go to the src/NE directory and type ./goozzeeNE. If you use a Mac OSX computer, just double-click the GoozzeeNE.app icon.
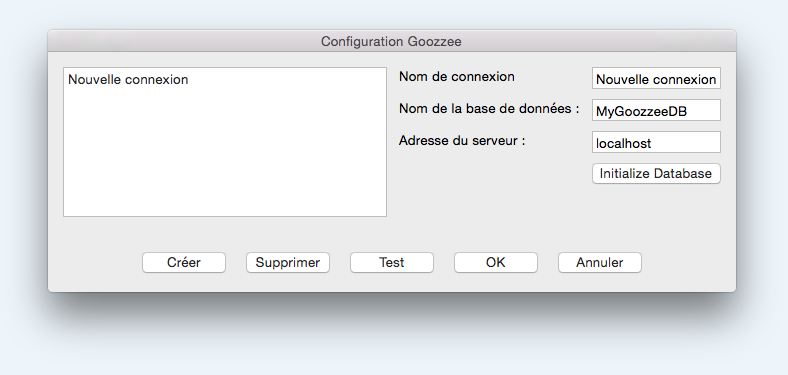
Since it's your first run, Goozzee will open its configuration screen for you to create the connection to your mysql database. You can use this configuration dialog to setup multiple predefined connections to different databases (for example one for test data, one for professional stuff, one for personal data...).
Keep in mind that each repository is a separate database schema. And Goozzee can only access the data from one repostory at a time.

To connect to an existing database or create a new one, click the New button, enter a name for that connection, enter the database name (the one you specified when initializing your database), and the IP address or DNS name of your database server (127.0.0.1 or localhost if you run the database server on this same machine).
Database initialization from the configuration screen
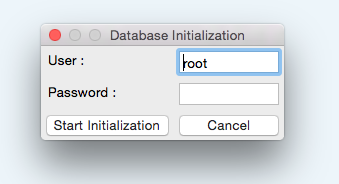
Once you haved entered the name of the new database and the addres of the database server, you can click the Initialize Database button. This will open the following popup :
Here, you must enter the user ans password of the Mysql administrator user (by default, root), and click the Start initialization button. This will create the new database on the Mysql server, initialize it with basic topics, and create the goozzee administrator user (named admin_<the name of the database>).
Once the initialization is completed, a popup will give you the password that was generated for the admin_xxx user. Please note carefully this password, or you won't be able to connect to your new database. Afterwords, you'll be able to change this password from Goozzee users management screen.
Beware that, if you launch the initialization of an existing database, it will completely erase the data contained in that database. (but in this case, a popup will warn you of the danger).
If you don't have access to the Mysql administrator's user and password, then your Mysql administrator will have the create and initialize the new database manually, using the following method :
Database initialization from scripts
The installation requires a running Mysql or MariaDB database server (>=5.5. Note : If you want to use an earlier version of Mysql, you'll have to recompile the mysqlclient.cpp source with a corresponding version of the libmysqlclient library).Linux and Mac OSX
To initialize the repository, copy the initMysqldb.bsh and initMysqldb.sql files onto the database server. You must execute initMysqldb.bsh as root, unless your user has administrative rights on Mysql. This script will :- create a new database,
- create the first Goozzee user – the administrator, the only one who will be allowed to create new users,
- populate the database with some necessary topics and associations.
- the path to your Mysql installation (i.e. the directory containing the mysql executable), if it can't find it automatically
- the password needed to connect to the database server with the root account
- the name of the database you want to create
- a secret string that will be used to help securing Goozzee passwords
- the name of the first user to create, and his password.
Windows
If your Mysql server is sitting on a Windows machine, you'll have to use the iniMysqlWIndows.sql file to initialize your Goozzee repository.First, you'll have to edit this file and replace a few string according to your likings :
- $DBNAME should be replaced by the name of the database you want to create.
- $USERNAME should be replaced by the name of the first Goozzee user that will be created during the initialization. Beware that this user will be the administrator of your repository, and you won't be able to rename it afterwards.
- $PASSWORD should be replaced by the password of this user
- $PREFIX should be replaced by a secret string that will be used to enforce the passwords security.
mysql -u root < initMysqlWindows.sql
Your repository should now be initialized.
Special Mysql configuration
Mysql can store documents as large as 4GB. But this is not enabled by default : in your Mysql ini file, you must set the max_allowed_packet option. For example :
max_allowed_packet=16M
will set the maximum blob size to 16 Mbytes.
What's more, you can tune the full text searches, by telling Mysql the minimum word size to take into account when building its full text indexes. In your Mysql ini file, set the following option :
ft_min_word_len=3
Here, for example, we tell Mysql to index words as short as 3 characters.
First login
When you've finished with this configuration, click the OK button to get to the authentication dialog.

Make sure that the connection you just created is selected, and connect using the user and password that was given initializing the database.
